
 Now your brand new website should be up and running. Congratulations! Today’s lesson covers how to organize a website for the very first time. We will delete unnecessary content that is there by default, set up the site ready for your own content, and add two essential pages: About Me and Private Policy.
This is Lesson 5 of this affiliate website training series. Thus far in the previous lessons, we have learned the following:
Lesson 1: Pick a niche
Lesson 2: Pick a website title
Lesson 3: Purchase a Domain name (You can skip this for a free website)
Lesson 4: Create a website (on a reliable hosting)
Be sure to go through these lessons first before you try today’s lesson.
Start Out with ONE Company
If you search on the web, you can find tons of companies that sell domain names (lesson #3) and provide services for hosting (lesson #4). My recommendation is to do the two not separately but in one place.
Companies like HostGator.com or Namecheap.com provide both domain names and hosting. Unless you are a tech savvy person who already knows how to direct DNS to a host site, have your very first website supported by one company. It would make the beginning phase of your online journey less complicated.
My #1 recommendation is Wealthy Affiliate University. They of course provide domain names and hosting, and not only that, they also offer you training on how to monetize a website AFTER you create one.
Creating a website is not the goal of your business. It is merely the beginning. You have to learn how to monetize a website, and Wealthy Affiliate trains you through the process.
If you wish to copy what I did and make the best out of this tutorial, first make a free account at Wealthy Affiliate (no payment information required) and come back. I use their resources in this lesson as well, so it benefits you to have access to their materials.
Clean Up the Dummy Content
Ok, back to today’s lesson.
Today we are going to log into the admin area of our new site for the first time and do some cleaning and basic setups.
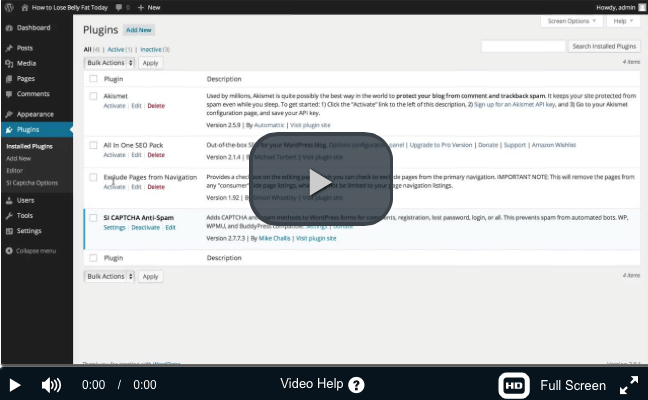
My new website about “Himalayan pink salt” is now up and running but not properly set up yet. On Day 1, it looked like this. (Now it looks very different)
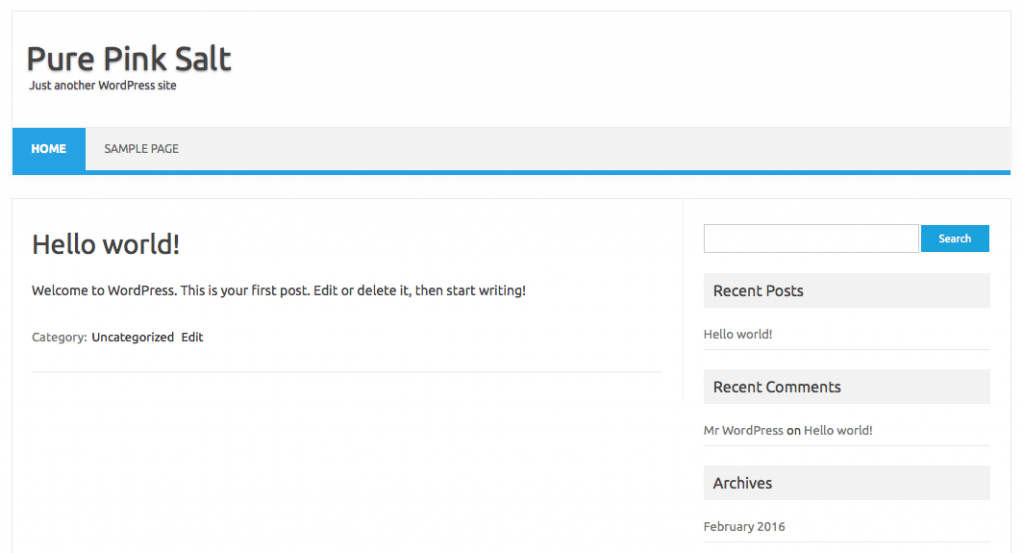
As you can see, there is some default content that already exists on my brand new site, like the sub-headline “Just another WordPress site” under the title “Pure Pink Salt,” the Sample Page on the menu bar and greeting message “Hello world!”
I didn’t create them. WordPress automatically added them only for example purposes.
 Before starting to add our own content, we need to delete them.
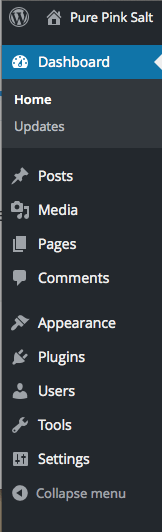
Login to the back office (Dashboard) of your website and you’ll see a menu bar on the left-hand side in the dashboard.
Delete the Dummy Post
Posts > Hover over “Hello world!” > Click Trash
Delete the Dummy Page
Pages > Hover over “Sample Page” > Click Trash
Delete the Dummy Comment
Comments > Hover over the comment from “Mr. WordPress” > Click Trash
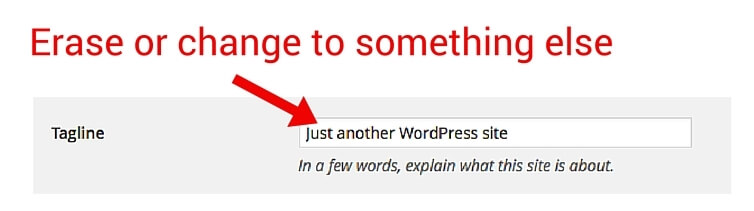
Delete the Dummy Sub-Title
Setting > General > Under Tagline, erase “Just another WordPres site” or add your own Sub-Title
I changed it to “Precious Gifts from Gaia.”
Watch the entire process in this tutorial video. It shows how to navigate your website back office as well.
How to Add Content on WordPress
Now your website is clean of dummy stuff and we are ready to add our own content.
Content can be various things. They could be pages, posts, images, or videos, etc. At the beginning of your online endeavor, you’ll be mainly focusing on creating pages and posts.
What is the difference between pages and posts in WordPress?
Both pages and posts are content in written format that you will be creating on your website.
Pages are static content that is not time-sensitive. You may want to select Pages for writing About Me, Privacy Policy, Affiliate Disclaimer or major articles that support the core concept of your website. Pages go to your Menu by default.
Posts, on the other hand, will flow through your website chronologically. As you create them, it goes naturally to your blog roll (stream) in chronological order. You can write various topics relevant to your niche as Posts.
In my posts (blog) at PurePinkSalt.com, I’ll perhaps cover subjects such as Himalayan bath salt, lamps, candle holders, cooking blocks, cleaning gear or my favorite local shops that sell Himalayan salt.
In pages, I plan to cover things like the origin, history, or health benefits of Himalayan salt.
Let’s create two pages in today’s lesson. Privacy Policy and About Me pages.
What is a Privacy Policy Page?
Privacy Policy Page tells people who visit your website how you are going to use their data.
Most likely, your visitors will never read this page. But it is still recommended to have it on your website because many affiliate programs require a Privacy Policy Page in order to approve your affiliate membership.
Go to Page > Add New
Type in “Privacy Policy” in the title area.
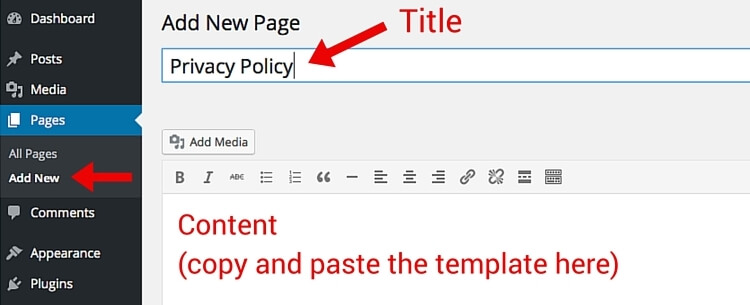
You can access to a template of Private Policy in the training at Wealthy Affiliate. Simply copy the statement and paste it on your page.
NOTE: Just don’t forget to replace your actual website URL (domain name) with the “YOURWEBSITE.com” text in the template. In my case, I would replace my URL: PurePinkSalt.com.
When you are all done, you can click “Publish.”
You can view my Private Policy page here.
Write an About Me Page
This is the page you introduce yourself to your readers. It’s a great place to connect with your audience so let them feel what kind of person you are.
- Share your own story, tell people how you got involved in your respective niche and what experiences you have had
- Explain why you want to help people in the niche
- Have a personal image of you (or something relevant) … we are going to cover how to add images in a later lesson
Go to Page > Add New
You can name this page either About Me, About [Your name], Who Is [Your name]? or something similar. Be creative!
Your “About Me” page will evolve over time, so please don’t try to perfect it at the moment.
Watch this tutorial video as to how to create an effective About Me page.

You can also view my “About Me” page here.
That’s it! You’ve just added two new pages to your website. Pat yourself on the back, it’s a great achievement!
You Now Have Two Items on the Menu Bar!
Through this lesson you’ve learned how to organize a website fist time and add two static pages: Private Policy and About Me.
Once I completed those two pages on my new site, PurePinkSalt.com, now the menu bar looks like below. Again, pages you create naturally go to your main Menu by default.
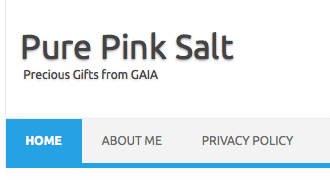
Later in this training series, we are going to learn how to organize the menu bar.
Your website is coming along well. 🙂 In the next lesson, we are going to work on your site structure (framework), and add an article that is relevant to your niche. I explain how to come up with content ideas, do research on them before you attempt writing an actual article. It’s getting exciting, isn’t it!
I hope you enjoyed this lesson. As always, if you have any questions or comments feel free to leave them down below. Thank you!
Yuko

Be the first to comment on "How to Organize a Website First Time – Tidy Up!"